Concrete Rocks!

First off, I have to say that this was written a couple years ago, and I am just now publishing it. I’m going to try to start posting some current projects, but we’ll see how that goes with my currently workload.

Anyways, I had been doing some gardening and planting around the house. I would consider my success low to moderate. After several months, my list of garden related projects has grown more than anything in my garden.

One of these projects started with trip to Home Depot with my wife and the purchase of a lemon tree. It is a very cute little lemon tree, and we decided that it would be best planted in a planter… a large planter. The requirements handed down were:

  • About 50 gallons
  • Not plastic
  • Not square

I looked around online, and didn’t find anything that directly met these requirements. Most of the large planters were squarish, too small, or plastic.

There is facility near our house that manufactures concrete sculptures, fountains, bird baths, and anything else they dream up. A quick trip there revealed a couple of things: concrete pots are expensive, concrete pots are heavy, and they aren’t typically near 50 gallons.

What is the logical conclusion? Make one.

After some research, I decided to have a go at it. There are quite a few online resources describing different ways to go about making a large planter, some of them kind of agree with each other, but none were exactly what I wanted.

I did have a large plastic planter, and I decided to use that as a starting point. It became the mold, and I essentially stucco’d the inside of it. For the sake of anyone else that wants to follow this pursuit, I am going to include some of the basic steps.

Find something to use as a form. As I mentioned, I had a large plastic planter that probably came with a tree at some point in the past. It obviously didn’t meet the no plastic requirement, but it worked well as a starting point.

Make sure that the the form will hold the concrete. My form had holes, but some duct tape remedied that.

How to remove the planter once the concrete sets? After looking at much conflicting information online, I went with a thin layer of motor oil as a release agent.

Is reinforcement required? I don’t know, but placed chicken wire in the mold. I do not know if it is serving any structural purpose, but it definitely acted as a lath to hold the concrete before it set.

What type of concrete to use? I spent quite a bit of time researching it. Online sources didn’t seem to be in agreement, so I finally just went to a masonry supply store, gave them my credit card, and bought what they told me. It is some type of mortar used for stucco that has fiber reinforcement. I hate to say it, but I’d suggest just going to the store and consulting a professional.

How best to remove it from the mold? This was my favorite part. Notice the piece of 3/4″ PVC protruding from the base of the planter. Not shown is an open flange to mechanically hold it in place that also serves as a hydraulic conduit to the microannulus between the plastic mold and the concrete planter. I pumped water down the PVC which then filled the microannulus in an attempt to “float” the concrete planter out of the form.

Was floating the concrete out successful? Kind of.

It did actually float. However, that didn’t help me to get it out. I ended up tipping everything over and dragging the planter out by its PVC. I made two more, and on those I did not even try to float the concrete planter. Instead I just tipped the assembly over, rolled it around to separate the concrete from the form, and drug it out with the piece of PVC.

It has been a couple years since I created these and they have served me well… two contain olive trees and one a lemon tree. I plan to post the final product in the near future.

IN CONCLUSION:

  • Will I make another? Hopefully not.
  • Is it neat that they were home made? I guess if you’re naive enough like that kind of stuff.
  • Are they heavy? Absolutely… it takes a forklift to move them around.
  • Would I prefer a plastic planter? Absolutely.

While the heft of my home made planters might act as a theft deterrent, I’d argue that thieves could find something more valuable to steal than my olive and lemon trees. Unfortunately, most would argue otherwise.

Creepy Guy by the Water Cooler

You know that creepy guy at work that is always hanging out by the water cooler? Well, I have been working from home quite a bit, and I have a water cooler. By default, that made me the creepy guy by the water cooler. Notice, I said “made” and not “makes”. I have the problem solved! Now there is the pictured creepster to take my place.

I also always wanted an aquarium. However, I didn’t want to worry about keeping up with it, figuring out what kinds of fish get along, deciding on salt water vs fresh water… you get the point. Now there is no need. I have a maintenance free aquarium!

All joking aside, it is always fun to play around with paint. What started as a face drawn with a Sharpie turned into various attempts with paint. If you want to play around with this, I have a few suggestions:

  • Roughen the surface: the aquarium jug images rubbed off fairly easily when transported for refill, so I lightly sanded next jug and it was much more durable.
  • Acrylic paint seems to work fine. I used the cheap acrylic paint from Wal-Mart.
  • If you are going to look through the jug at the painted images, be sure to think it out and paint in reverse order. For instance, paint the things that will be in the foreground before the things in the background.
  • On the fish tank, my wonderful wife had the idea of drawing the outline of everything in black and then filling in the color. I think it turned out great that way. You don’t even have to be careful to keep inside of the outlines because you won’t be able to see it!

This wasn’t the most intricate DIY project in the world, but I thought it was fun and added some color to the pantry. I can’t wait until I break one of these jugs so we can paint another!

If you try it, you can celebrate with some good old fashioned fire water when you finish!

Chicken Feeder and Precrastination

In some of my previous posts (Chicken Coop Automation 1 and Chicken Coop Automation Part 2 ), I mentioned preemptive laziness and how it relates to my chicken habit. After reading those posts, my wife coined a new word: precrastination. I liked the term, and I defined it to mean doing a task ahead of time to allow more free time in the future. It turns out precrastination is a real psychological term, and its real definition is performing a task before it is beneficial or optimal to do so. I just can’t win. I guess I need to procrastinate my precrastination to reach an optimal state of crastination.

Regardless, I think I crastinated this chicken feeder just right. The idea actually came from the internet of googles, but it works very well so I thought I’d pass it on.

Originally I had a traditional chicken feeder that fed the ground better than it fed the chickens. I would fill it up with a couple pounds of feed, and most of it would end up on the ground the next day. This didn’t align with my laissez faire chicken policy.

Some research provided some exotic and elaborate feeding systems that had been created: from electronic rationing systems to screw drive feeders with an auger. While I am a firm believer in over engineering and Rube Goldberg devices, I didn’t want to deal with the calibration, sensors, programming, and expense for this particular project. I did some more research and discovered that I could make a very simple feeder with some advanced engineering materials: hot glue, a bucket, and some PVC… pretty much all of the good stuff minus duct tape and zip ties.

The feeder is pretty basic and shouldn’t require much explanation.

  • Get bucket.
  • Get PVC elbow
  • Get hot glue gun
  • Cut hole in bucket
  • Trim one end of PVC elbow
  • Hot glue PVC elbow in hole

Right now, I have one of these made from a square bucket and two made from round buckets. Rather than putting feed in a couple pounds at a time and having it trampled into the ground, I fill up all three about once a month with 50# of pellet feed and have virtually no waste.

The only variable I’ve played with is the height of the internal mouth of the PVC above the floor of the bucket:

  • 1/2″: too low, and the feed does not feed very well
  • 1″: the feed feeds fairly freely
  • 1 1/2″: (.125 feet) feed feeds forth flawlessly forming a fully functional first-rate fowl feeder

I would also like to note the importance of using feed pellets rather than crumbles. Crumbles muck up the whole works.

The neat thing about this project is that more time is spent driving to the store and buying the components than actually building the feeder!

Be Careful What You Bet For, A Love Story

My wife Eva is a beautiful, caring, smart, funny, creative, sometimes shy woman. When I decided to propose to her, I wanted to do it in a way that would be memorable, but not put her too much on the spot. If she wanted to say no, I wanted to make sure she wasn’t pressured into saying yes. How do you make a memorable proposal to a beautiful, caring, smart, funny, creative, sometimes shy woman without making her feel forced into it? It all starts with a simple bet.
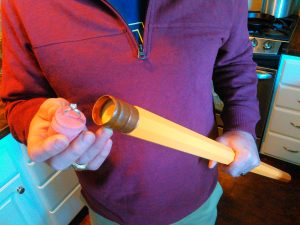
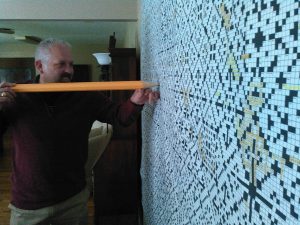
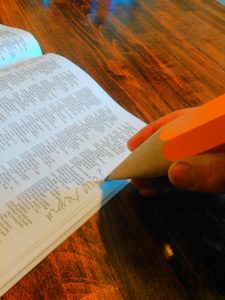
One night during dinner, we were joking around and somehow the subject of pencils came up. More specifically, the number of sides a pencil has. I was sure pencils had 8 sides, she was sure pencils had 6 sides, so we made a bet. I do not remember her side of the bet, but mine was to get married if I was right. She thought she knew the number of sides of a pencil, and she thought I was joking about the bet. She was right on one of those accounts… a traditional pencil has 6 sides, but I wasn’t joking about the bet. She forgot about the bet, I didn’t.

We went on “hanging out” for months and months. One of the things we enjoyed was sitting on a patio somewhere with beer and a crossword puzzle. I’d mostly read the clues and scratch my head, she’d mostly answer the clues, and it was always entertaining.

I finally decided that I had to make a plunge and see if we might be right for each other. I tracked down her dad’s phone number to ask for her hand. His response was something along the lines of “That is fine with me. I’m not sure it will be fine with her.” I had to find out.

I initially planned to make an engagement ring, but I finally opted to go with something more professional. I don’t think that JB Weld does much to enhance the beauty of a diamond. I learned more than I ever cared to know about diamonds, and I bought a ring.

Now back to making a memorable proposal to a beautiful, caring, smart, funny, creative, and sometimes shy woman. I knew I had lost the bet regarding the sides of a pencil, so I cheated. I found https://pencilcraft.com/ , who makes custom labeled larger-than-life pencils. They make them with real erasers and real lead, but only in the normal 6-sided variety. I hired them to custom make an 8-sided 4 foot long pencil. She lost the bet… she couldn’t back out… I was going to prove that they do make pencils with 8 sides.

What else does a guy with a ring and a GIANT eight sided pencil need to propose to a beautiful, caring, smart, funny, creative, sometimes shy, woman? More of a plan.

I started exploring options to present the ring to her, and I discovered that I could remove the eraser from the pencil and carve out a place for a ring. How to work dinner conversation towards a giant 8 sided pencil that happened to be holding an engagement ring? A giant 6 foot crossword puzzle of course (ala the Sky Mall magazine that used to be in airplanes, remember those?).

Here is how it all played out.

We went to a Benjy’s: a great restaurant where I happened to know Chef Mike Potowski. I had previously purchased the giant 6 foot crossword puzzle, wrapped it, and wrote a note from the chef saying “I knew y’all liked crossword puzzles… thought this was funny… you might get a kick out of it…” I left the gift and the larger-than-life pencil with the restaurant’s wait staff before picking up my future wife for dinner.

At some point in dinner, the waiter was instructed to bring the “gift” crossword puzzle. Eva was quite confused about the “gift”, but it was Christmas time and she shrugged it off. We opened the crossword puzzle, looked at it, laughed a little, and continued eating.

The waiter came by later, and he asked about the gift. We told him it was a giant crossword puzzle, and it was a shame that we didn’t have a giant pencil to start solving it. “I might be able to help,” he said as he walked back to the kitchen to get the giant larger-than-life pencil with the hidden ring. When he returned with the giant 8-sided pencil, Eva was confused. She didn’t remember the bet, and she just thought some of my normal jackassery was afoot.

We continued eating and started looking at the crossword puzzle’s clue book. I wanted to show her that the giant pencil was functional, so I wrote “marry me?” on a page in the clue book. She read it and slowly looked up in confusion as I pulled the eraser off the giant pencil revealing the ring. I think she said no then yes, or yes then no, then maybe yes… I can’t remember. The whole time the waiter was prepared with celebratory champagne to bring us, but I kept shooing him off. She wasn’t prepared for the proposal, and it turned into a very long dinner. There were lots of tears shed, and Eva was nice enough to lend me her napkin so I could wipe my eyes.

She finally said yes, we drank our champagne, and we were engaged for a little while. Then we weren’t engaged for a little while. Then we got a marriage license, my dad got ordained, and we were married!

I know that I usually post DIY type info, and this isn’t that. It is just a way to document what led to the best event in my life.

For the purists out there, it should be noted that the pictures were taken at a later date… I ran off the papparizi before dinner to reduce unwanted pressure on my marvelous wife.

Cutting Edge Science

One of my first tool purchases when I graduated from college was an air compressor. I wanted one my whole life, and I finally had the means to purchase one. It worked great for years, but along with usage and age came problems. The check valve in the tank leaked after a few years, several years later the unloading valve stuck so it couldn’t restart under pressure, the centrifugal starting switch flew apart at some point… but I always managed to bring it back to life. Its efficiency dropped over time, and eventually it would not build over 90 psi.

This compressor was 20 years old and designed for disposal rather than repair. I had already had picked up a large commercial compressor, so the logical course of action was to scrap the old unit. Destined for the scrap pile or not, I just had to know what failed. I took the compressor apart and discovered that the reed valves had cracked.

If you are not familiar with reed valves, they are pieces of sheet metal that seal against a hole in one direction and let compressed air pass in the other. During operation, pistons reciprocate in a cylinder compressing air and forcing it past the reed valves and into a tank. The compressed air is then restricted from returning from the tank by reed valves. In my particular compressor, this happens about 60 times every second in each of 3 cylinders!

I had already decided that compressors are considered disposable these days, that this particular one had dutifully served me for years, and that I needed to let it pass on to the great scrap pile in the sky. However, I was curious how much a replacement reed valve would cost if I naively decided to fix it. After some searching, I found the correct valve for my model number was available for only $2.37. WAS is the key term… it had been on backorder since 2005. Did I want to scrap my compressor for lack of a $2.37 sheet metal part that was once available? Obviously not. I decided to make a reed valve.

I did some research and found some hardened spring steel shim stock (strong sheet metal) that I thought would make an acceptable reed valve, ordered the shim stock, and tried to find a way to cut out the part. What is the most obvious way to cut thin sheets of metal? Snips?

Snips are my my preferred tools when I want to be intellectually humbled. I can think about the shape I need to cut, ponder best way to attack the sheet metal, be patient and deliberate… but the tin snips always do what they want. Not what I want. Convincing snips to cut a shape is like convincing cats to go somewhere that they don’t want to go. In the end you are cut, scratched, scraped, bleeding, confused, demoralized, and have only accomplished what your adversary wanted all along.

I put down my snips, picked up the internet, and decided to use SCIENCE to manufacture the reed valves. I found that it is fairly simple to electrochemically etch a complex shape from sheet metal without the plastic deformation and warping typical of other methods..

I am not going to go into the detailed science behind the project, but all that is needed is a DC power supply (12V battery or charger), some salt water, some alligator clips, some spray paint, a sacrificial piece of metal, and the sheet metal workpiece. Send me a comment if you want more details or suggestions for your own project.

The basic steps are:

  • Lightly sand, clean, and paint both sides of the sheet metal workpiece (the paint will act as an electrical insulator).
  • Scribe the desired shape onto one side of the workpiece. Make sure to scribe through the paint so that metal is exposed.
  • Use alligator clips to attach the workpiece to the positive terminal of the power supply.
  • Use alligator clips to attach to a sacrificial piece of metal to the negative terminal on the power supply.
  • Place the workpiece and sacrificial piece in a plastic container filled with salt water. Make sure the workpiece and sacrificial piece do not touch each other.
  • Watch the workpiece bubble for about 45 minutes.
  • Remove the workpiece from the salt water and rinse thoroughly.

For this particular experiment, I used the used the old reed valves as a template and traced each lobe onto the workpiece with a scribe. The final results are pictured at the beginning of this post. It was little effort while things were set up, so I made two parts. Now I can fix my compressor again 20 years from now when parts are over 30 years on backorder.

Any advice I can give for the next DIYer that wants to cut sheet metal?

  • Bend the attachment point for the alligator clips on both the workpiece and sacrificial piece so that they are not under the salt water. I discovered that the alligator clips were much more prone to electrochemical etching than the workpiece.
  • I don’t know if the bubbles coming off of the workpiece were caustic or not.  I held my breath for the 45 minute duration just in case.
  • If you want to etch a design onto a piece of metal rather than etching through the metal, the DC Power supply can be replaced with an AC power supply. This will visibly etch the surface, but it will not cut through the part.

UPDATE: I am more surprised than happy to report that the compressor works as well as ever with its new reed valves! I am adding a reminder on my calendar to update this post in 20 years. Stick around, and we will see if the custom reed valves last as long as the factory part did.