 My wife Eva is a beautiful, caring, smart, funny, creative, sometimes shy woman. When I decided to propose to her, I wanted to do it in a way that would be memorable, but not put her too much on the spot. If she wanted to say no, I wanted to make sure she wasn’t pressured into saying yes. How do you make a memorable proposal to a beautiful, caring, smart, funny, creative, sometimes shy woman without making her feel forced into it? It all starts with a simple bet.
One night during dinner, we were joking around and somehow the subject of pencils came up. More specifically, the number of sides a pencil has. I was sure pencils had 8 sides, she was sure pencils had 6 sides, so we made a bet. I do not remember her side of the bet, but mine was to get married if I was right. She thought she knew the number of sides of a pencil, and she thought I was joking about the bet. She was right on one of those accounts… a traditional pencil has 6 sides, but I wasn’t joking about the bet. She forgot about the bet, I didn’t.
We went on “hanging out” for months and months. One of the things we enjoyed was sitting on a patio somewhere with beer and a crossword puzzle. I’d mostly read the clues and scratch my head, she’d mostly answer the clues, and it was always entertaining.
I finally decided that I had to make a plunge and see if we might be right for each other. I tracked down her dad’s phone number to ask for her hand. His response was something along the lines of “That is fine with me. I’m not sure it will be fine with her.” I had to find out.
I initially planned to make an engagement ring, but I finally opted to go with something more professional. I don’t think that JB Weld does much to enhance the beauty of a diamond. I learned more than I ever cared to know about diamonds, and I bought a ring.
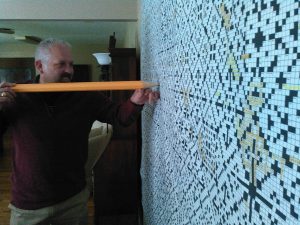
Now back to making a memorable proposal to a beautiful, caring, smart, funny, creative, and sometimes shy woman. I knew I had lost the bet regarding the sides of a pencil, so I cheated. I found https://pencilcraft.com/ , who makes custom labeled larger-than-life pencils. They make them with real erasers and real lead, but only in the normal 6-sided variety. I hired them to custom make an 8-sided 4 foot long pencil. She lost the bet… she couldn’t back out… I was going to prove that they do make pencils with 8 sides.

What else does a guy with a ring and a GIANT eight sided pencil need to propose to a beautiful, caring, smart, funny, creative, sometimes shy, woman? More of a plan.
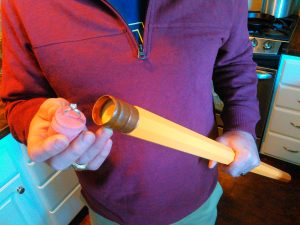
I started exploring options to present the ring to her, and I discovered that I could remove the eraser from the pencil and carve out a place for a ring. How to work dinner conversation towards a giant 8 sided pencil that happened to be holding an engagement ring? A giant 6 foot crossword puzzle of course (ala the Sky Mall magazine that used to be in airplanes, remember those?).
Here is how it all played out.
We went to a Benjy’s: a great restaurant where I happened to know Chef Mike Potowski. I had previously purchased the giant 6 foot crossword puzzle, wrapped it, and wrote a note from the chef saying “I knew y’all liked crossword puzzles… thought this was funny… you might get a kick out of it…” I left the gift and the larger-than-life pencil with the restaurant’s wait staff before picking up my future wife for dinner.
At some point in dinner, the waiter was instructed to bring the “gift” crossword puzzle. Eva was quite confused about the “gift”, but it was Christmas time and she shrugged it off. We opened the crossword puzzle, looked at it, laughed a little, and continued eating.
The waiter came by later, and he asked about the gift. We told him it was a giant crossword puzzle, and it was a shame that we didn’t have a giant pencil to start solving it. “I might be able to help,” he said as he walked back to the kitchen to get the giant larger-than-life pencil with the hidden ring. When he returned with the giant 8-sided pencil, Eva was confused. She didn’t remember the bet, and she just thought some of my normal jackassery was afoot.

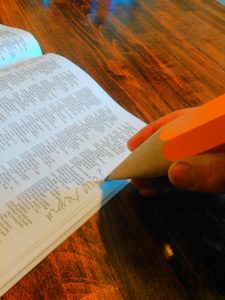
We continued eating and started looking at the crossword puzzle’s clue book. I wanted to show her that the giant pencil was functional, so I wrote “marry me?” on a page in the clue book. She read it and slowly looked up in confusion as I pulled the eraser off the giant pencil revealing the ring. I think she said no then yes, or yes then no, then maybe yes… I can’t remember. The whole time the waiter was prepared with celebratory champagne to bring us, but I kept shooing him off. She wasn’t prepared for the proposal, and it turned into a very long dinner. There were lots of tears shed, and Eva was nice enough to lend me her napkin so I could wipe my eyes.
She finally said yes, we drank our champagne, and we were engaged for a little while. Then we weren’t engaged for a little while. Then we got a marriage license, my dad got ordained, and we were married!
I know that I usually post DIY type info, and this isn’t that. It is just a way to document what led to the best event in my life.
For the purists out there, it should be noted that the pictures were taken at a later date… I ran off the papparizi before dinner to reduce unwanted pressure on my marvelous wife.


 My wife Eva is a beautiful, caring, smart, funny, creative, sometimes shy woman. When I decided to propose to her, I wanted to do it in a way that would be memorable, but not put her too much on the spot. If she wanted to say no, I wanted to make sure she wasn’t pressured into saying yes. How do you make a memorable proposal to a beautiful, caring, smart, funny, creative, sometimes shy woman without making her feel forced into it? It all starts with a simple bet.


 Have you ever heard of Shipwright’s Disease? Though I don’t have a ship (or even a boat) it is something that I have been plagued with my entire life, and I personally consider Shipwright’s Addiction to be more appropriate. I was made aware of the affliction years ago, and I am seeing its effects more and more as I grow older. In lieu of an actual definition, it was explained to me this way:
 My Craigslist purchase of a wort chiller came with some more brewing “stuff”. The volume of beer I need to brew to justify the equipment required a way to dispense a larger volume of beer. I went to Craigslist and purchased a kegerator. The kegerator wouldn’t fit the size of keg I had acquired, so I built a bigger kegerater. My bigger kegerator had empty space, so I needed to more kegs… and CO2 bottles… and a CO2 filling station… and it kept going. It is really not my fault. Craigslist is obviously to blame.

 A good source of nichrome wire is from the heater elements of an electric dryer, and it seems to be good to about 2000 F. It is important to do your homework on the length. It must have enough resistance to limit the current or it will be annihilated as soon as it is powered up.
 Ceramic wool seems to be good to at least a couple thousand degrees Fahrenheit. It is also a good thermal insulator. I had no problem touching the outside when it was 1700 F inside. You can also see that the electrical tape around the flashing didn’t melt or deform after operation.


